I wanted to come up with something clever that was my friend's style so I could have something to give her when my family went to her home for a visit. I know she likes the paint chip DIY projects on Pinterest and I prefer to bring flowers. Combine the two things and, "Voila!" you have yourself a neat little DIY gift.
What you'll need:
- Paint chips {good news! These are free! Just don't go crazy, mmmkay?} I used the Behr paint chips that are short and wide.
- Scotch Tape
- Floral Tape
- Straight Drinking Straws
- A Vase {I picked mine up at the dollar store!}
And should you choose to make a little personalized note like I did, you'll need a machine that can embroider letters.
- Take the paint chip and cut some fringe on this. Now, I did this by hand with scissors but some crafters have handy, dandy paper cutters that may be able to do this a lot faster.
When I cut the fringe, I tried to make sure the cuts ended at the same point and were about the same width.
2. Tightly roll up the paint chip, colored side in, along the portion that was not cut.
3. Holding the rolled up paint chip tightly, tape it into place.
4. Gently pull out the separate pieces to open up the flower and then run your thumbnail along the back of each piece to give it a slight curl.
**For variation in size, I cut some paint chips to be a little smaller.
**Now...it's time to grab your floral tape and straws.
5. Put the straw in the bottom of the flower and...
tape it into place.
6. Twist the floral tape tightly around the base of the flower and all the way down the straw.
At this point, your flowers are good to go! I had to add a finishing touch to my project, though, as it was for a dear friend. So, I grabbed yet another paint chip and headed to my Brother Laura Ashley Innov-is machine.
This is what I made. {The scripture referenced here says "I thank my God in all my remembrance of you".}
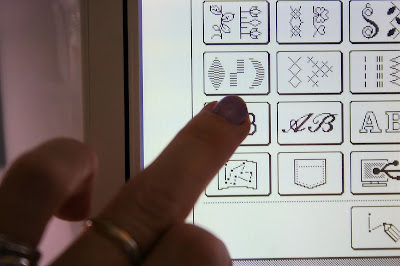
So, by selecting "Character/Decorative" on the touch screen, I found letters to use,
typed it out,
and that was it! I trimmed the threads, cut it down to size, added a couple hole punches, and tied it with ribbon to the vase.
And that is my finished look!
Alright, now. Go create some of your own and have fun!


0 comments:
Post a Comment
I am so happy you stopped by today. What is on your mind?