User-agent: Mediapartners-Google Disallow: User-agent: * Disallow: /search Allow: / Sitemap: https://www.amy-clary.com/sitemap.xml
Showing posts with label brother. Show all posts

Friday, May 18, 2012

Are you looking for a completely cute but inexpensive gift to bring to a teacher, friend, or hostess? I have JUST the idea for you {and it's not too shabby, if I do say so myself}.

I wanted to come up with something clever that was my friend's style so I could have something to give her when my family went to her home for a visit. I know she likes the paint chip DIY projects on Pinterest and I prefer to bring flowers. Combine the two things and, "Voila!" you have yourself a neat little DIY gift.


What you'll need:
  • Paint chips {good news! These are free! Just don't go crazy, mmmkay?} I used the Behr paint chips that are short and wide.
  • Scotch Tape
  • Floral Tape
  • Straight Drinking Straws
  • A Vase {I picked mine up at the dollar store!}

    And should you choose to make a little personalized note like I did, you'll need a machine that can embroider letters.
  1. Take the paint chip and cut some fringe on this. Now, I did this by hand with scissors but some crafters have handy, dandy paper cutters that may be able to do this a lot faster.
    When I cut the fringe, I tried to make sure the cuts ended at the same point and were about the same width. 


    2.   Tightly roll up the paint chip, colored side in, along the portion that was not cut.


  3.   Holding the rolled up paint chip tightly, tape it into place.


  4.   Gently pull out the separate pieces to open up the flower  and then run your thumbnail along the back of each piece to give it a slight curl.


**For variation in size, I cut some paint chips to be a little smaller.


**Now...it's time to grab your floral tape and straws.


  5.    Put the straw in the bottom of the flower and...


tape it into place.


  6.    Twist the floral tape tightly around the base of the flower and all the way down the straw.

At this point, your flowers are good to go! I had to add a finishing touch to my project, though, as it was for a dear friend. So, I grabbed yet another paint chip and headed to my Brother Laura Ashley Innov-is  machine. 


This is what I made. {The scripture referenced here says "I thank my God in all my remembrance of you".}


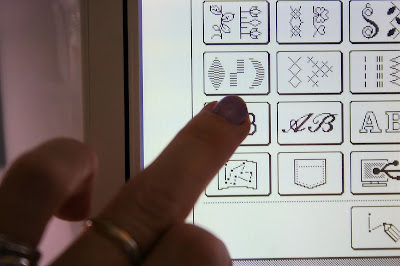
So, by selecting "Character/Decorative" on the touch screen, I found letters to use, 


typed it out,


and that was it! I trimmed the threads, cut it down to size, added a couple hole punches, and tied it with ribbon to the vase. 


And that is my finished look!

Alright, now. Go create some of your own and have fun!

Photobucket

Paint Chip Bouquet DIY

Read More

Tuesday, March 6, 2012


When I was browsing my favorite antique shop, I saw a sheet music table runner that I fell in love with...I just didn't love the price of it. I knew I could make it myself for next to nothing and get a look that was completely my own. I also knew my new dresser needed something to finish the look. 

Music fills my home on a daily basis. Whether it's in children's songs or on my iPod as I clean, we are always listening to and making music in our home. 

First, I needed sheet music. I looked for an old music book to tear pages out of but found a book of Disney songs at a thrift store instead. I thought this to be the perfect touch as it reflects my family and our likes. 

“Your home should tell the story of who you are, and be a collection of what you love brought together under one roof.”  Nate Berkus 

I couldn't bring myself to tear up the book I just bought so I decided on printing out some of the pages on cardstock {for durability}. I printed 5 different songs as my dresser is 5 paper lengths long. Then, I sat down with my sheet music at my Brother Innovis sewing machine.


My machine is loaded with all sorts of pretty stitching so I browsed through the styles until I found one I liked for the project.


 I found the perfect vine stitch and used it to sew my pages together. {Note: I overlapped the paper just slightly so I didn't have to worry about keeping it perfectly lined up from the end of one page to the beginning of the next. I hope that makes sense.}


The stitching looked so nice but I wasn't finished just yet. I had to cut the sides of the paper to give it a delicate edge. 


Enter, Fiskars Paper Edgers. {Found by the scrap-booking supplies in many craft stores}


See how classy that looks? 

And here's what it looks like on my dresser.


A simple project that took no time at all looks so nice to finish off my home decor.


I'm so happy with this DIY. Have you considered using sheet music as part of your decor?

Photobucket

DIY Sheet Music Table Runner {tutorial}

Read More

Wednesday, February 22, 2012


I saw something similar to this window project on Pinterest but wanted to use it in a little bit different way {as a dry erase board}. The problem was, there was no "how-to" for the window I saw so I had to think it through and make it on my own. 

Supplies:
  • One window
  • Fabric a little longer and a little wider than the panes of glass on the window.
  • Sand paper {if you're painting the window}
  • Paint {again...if you're painting}
  • Painter's tape {do I need to say it?}
  • Hot Glue Gun w/ glue sticks
  • Portrait hanging hardware

    {supplies for the banner are midway through the post}


Isn't this window ugly? Yes, it is.

BUT

This window cost only one dollar or two when my mom was shopping at a garage sale last year and it's loaded with potential.


First things first, I taped off the inside of the window panes with my painter's tape. I made sure to cover the glass and not any part of the wood so that I would end up with a nice, clean job when I was done.

Next. I grabbed my sand paper {I'm not sure what grit this was} and I sanded the window down to remove the finish on it. Use your "elbow grease" if you're doing it by hand like I was. In retrospect, this part would have moved along a lot quicker if I had borrowed my Dad's power sander. {Insert a sad attempt at a manly grunt here.}


Once the window is sanded, wipe it down with a damp cloth to get the dust off. Once it's clean, go ahead an paint it. I chose this robin's egg blue to go with the pink and blue theme I had for Mikayla.

Let the window dry.

{tick, tock, tick, tock}

And once it's dry, flip the window over and get ready to attach the fabric.

I wanted to make sure that my finished window wouldn't have fabric showing around the edge so I chose to attach it as close as I could to the inside of the frame without it touching the glass.

It's important to stretch the fabric until it's taut so it's best to start on one end and work over from there. I started on the right hand side with a line of hot glue from the top of the window to the bottom and then pressed down that end of the fabric. After letting the glue dry, I could tug on the fabric to make sure it wasn't sagging down. I pulled the fabric tight across the back of the window and then a bit at a time, I glued down the fabric on the top and bottom of the frame.

Three words...Keep It Taut.

It's not hard to do, it's just important to be mindful of that.


that fabric needs a good steaming...
 Technically, the window could be done at this point. Just grab a dry erase marker, write something on the it, and hang it up. :)

I, however, wanted to add a cute banner to give it a finishing touch.

Supplies for the banner:
  • scrapbook paper cut into triangles
  • sewing machine
  • 2 push pins
The amount of triangles needed depends on how big they're made and how close you would like them together. I chose 2 different patterns of paper so I stacked up my pieces, every other pattern at a time, and kept it nearby me at the sewing machine.


On my new Brother Innovis sewing machine, I selected a standard, straight stitch and started sewing.


I counted to 12 between each piece of paper to make sure the distance between pieces was equal.


On either side of the window, toward the front, push in the push pin. Then, wind the stitched thread around the pin, pushing the pin down as far as it will go to hold it in place. 


If you're pleased with the outcome, you're done! Otherwise, try winding different lengths of your banner to help it drape higher or lower until you're satisfied.


Write the message and attach the hanging hardware you've selected. We used hooks on either end of the window. {See below}


And...you're done!! 

PS: Click these links to hop over to the tutorials for the Tissue Paper Pom-Poms and/or the Mobile.

Photobucket

DIY Dry Erase Window {tutorial}

Read More

Saturday, February 4, 2012


Before Christmas {and the birth of my third baby}, I received this beautiful sewing machine to learn about, use, and share my experiences with all of you! That means I'll be posting some fun projects throughout the year and let you know how this lovely machine has made my life easier. 
What I found as I opened the box.
 This, my friends, is the Laura Ashley Innov-is NX200 from Brother and it does so much more than sew a stitch in a straight line. In fact, it's a bit overwhelming to me to be honest {in a good way}. There are so many options and step by step instructions, and accessories to make the process of sewing/quilting/embroidery go smoothly and easily. Yes, this machine has everything I could ever want or need and then some. Allow me to give you my first impression tour.


Built into the machine's detachable work space, I found storage for the various feet and bobbins I'll need as I move throughout one, big project or from one project to another. Having everything at my fingertips is just wonderful.


Speaking of "finger tips", check out these buttons! With one push, I can back stitch, raise and lower the needle, cut the threads from the needle and bobbin, and raise or lower the foot. I'm still trying to get used to these fancy options and find that I keep trying to create more work for myself by not using them all the time. {ha ha}


On the right side of the machine, I not only have the power button, but I also have a space to insert a memory card and a USB port. Yes, I can hook this lovely machine up to my computer to use stitches that are not already built in the machine as well as stitch designs that I custom design myself!


 By lifting up the top of the machine, I found where my thread would neatly hide away as I sew. Also, there's the bobbin threader. What I am smitten with is how easy it is to thread a bobbin. I simply follow the easy directions laid out for me and walk away. By pushing a button, the bobbin will begin threading and it will automatically stop when the bobbin is full. This is amazing because I had to hold my foot on the sewing machine's pedal to make this stop and go with my old machine.


Here you can see the 2 work areas that come with the Innov-is NX200. Attached to the machine is the wonderfully large work area that is perfect for big projects like quilts. On top of that is the smaller work space for everyday use. These 2 accessories make DIY home decor projects so much easier as well as whipping up outfits for the whole family {and their dolls}. 


On the machine's touchscreen is where the real magic happens, though. The world of sewing is just a touch away and should I have any questions, I can refer back to the screen. 


 There are 460 stitches total, including quilting, embroidery, and decorative styles inside these menus and on the disc that comes with the machine. I simply touch the stitch I desire to use and I can set it's size, how often I want it repeated, and other details before I get to work with it.


And if those weren't enough, there are step by step instructions on how to do things like free hand quilting, appliques, hems, scallops, and pintucks. Oh, yes. I just follow the easy instructions and before I know it, my project is complete and I am one happy camper. 


 Also included is this circular attachment. This allows me to create beautiful, detailed, circular designs to embellish quilts, pillows, or even clothing.

Can you guess what my first impression is of the Laura Ashley Innov-is NX200 from Brother? In short, my answer is "WOW!". I can't even begin to tell you how this gets the creative wheels spinning in my mind and throughout this year, I'll be sharing how I use this machine and hope to get you detailed looks at its many features. {Stay Tuned for that!}

Now, here are the specifics for you as listed on Brother's website:


  • 460 Included Sewing Stitches—430 built-in and 30 on CD
  • Virtually Unlimited Stitches with the My Custom Stitch™ Feature
  • Programmable Pivot Function
  • Automatic Height Adjuster™(AHA®) Feature for uniform stitches across varying fabric heights
  • Automatic Needle Threader and Simple Numbered Threading Guide
  • Three Specialty Free Motion Feet Included
  • Range of included accessories, including Bobbin Work Bundle, Circular Attachment and Extra-Large Quilting Extension Table
  • Available at Authorized Innov-ís Dealers Only

 Find out more about the Laura Ashley Limited EditionInnov-ís NX-2000!

**Thanks to Brother for supplying the machine for review. I received no compensation for this review. In this post, I share my opinions and experience in my own words. Others may disagree or may not have the same experience.**


Photobucket

Meet The New, Laura Ashley Innov-is NX200 from Brother!

Read More

Copyright © Amy Clary | Designed With By Blogger Templates
Scroll To Top